Salesforce
Welcome to the Link Money Salesforce B2C commerce cartridge. Check out our Link Money Pay by Bank solution and learn about the benefits of using this payment method.
Please contact our sales team to start your onboarding process. Once you are ready, please proceed to the installation guide.
Installation Guide
This document provides step-by-step instructions for installing and configuring the Link Money Pay by Bank cartridge for Salesforce Commerce Cloud. The cartridge enables seamless integration with the Link Money payment provider, providing a secure and efficient checkout experience for your customers.
Prerequisites
Before you begin, ensure you have the following:
- A Salesforce Commerce Cloud account and access to Business Manager.
- Access to your Commerce Cloud instance and its code base.
- Link Money credentials obtained after onboarding.
Installation Process
Follow these steps to install the Link Money cartridge for Salesforce Commerce Cloud.
Step 1: Contact Link Money Account Manager
Reach out to your Link Money account manager to request access to the cartridge. They will provide you with the necessary files and resources required for the installation.
Step 2: Upload Cartridge to Your Commerce Cloud Instance
Within the Link Money Salesforce B2C commerce cartridge’s public repository you will find two folders, cartridges and metadata. The metadata folder contains configuration files that you will need to import to the Business Manager of your instance. The cartridges folder contains two subfolders, int_linkmoney_sfra and app_storefront_base_sfra_changes. The int_linkmoney_sfra folder is the primary cartridge and contains all services, hooks, jobs, scripts and templates for implementing our payment integration. The app_storefront_base_sfra_changes folder contains a sample merchant demonstrating how to customize the base SFRA cartridge. Using the Business Manager or your preferred IDE, upload the int_linkmoney_sfra cartridge to your Commerce Cloud instance. Follow the standard cartridge upload process ensuring the files are placed in the correct directory within your instance.
Step 3: Update Cartridge Path
To configure the cartridge path in Salesforce Commerce Cloud, follow these steps:
- Log in to Business Manager and navigate to Administration > Sites > Manage Sites.
- Select the site for which you want to configure the cartridge path.
- Click the Settings tab.
- In the Cartridges field, enter the Link Money cartridge name in the colon-separated list of cartridge names. Make sure to place it in the desired position within the list, keeping in mind that cartridges at the beginning of the list (at the left) take precedence over cartridges at the end of the path (at the right). For example, if your current cartridge path looks like
app_custom_sfra:plugin_applepay:app_storefront_basethen you’ll need to update it to include the Link Money cartridge so it should look likeapp_custom_sfra:int_linkmoney_sfra:plugin_applepay:app_storefront_base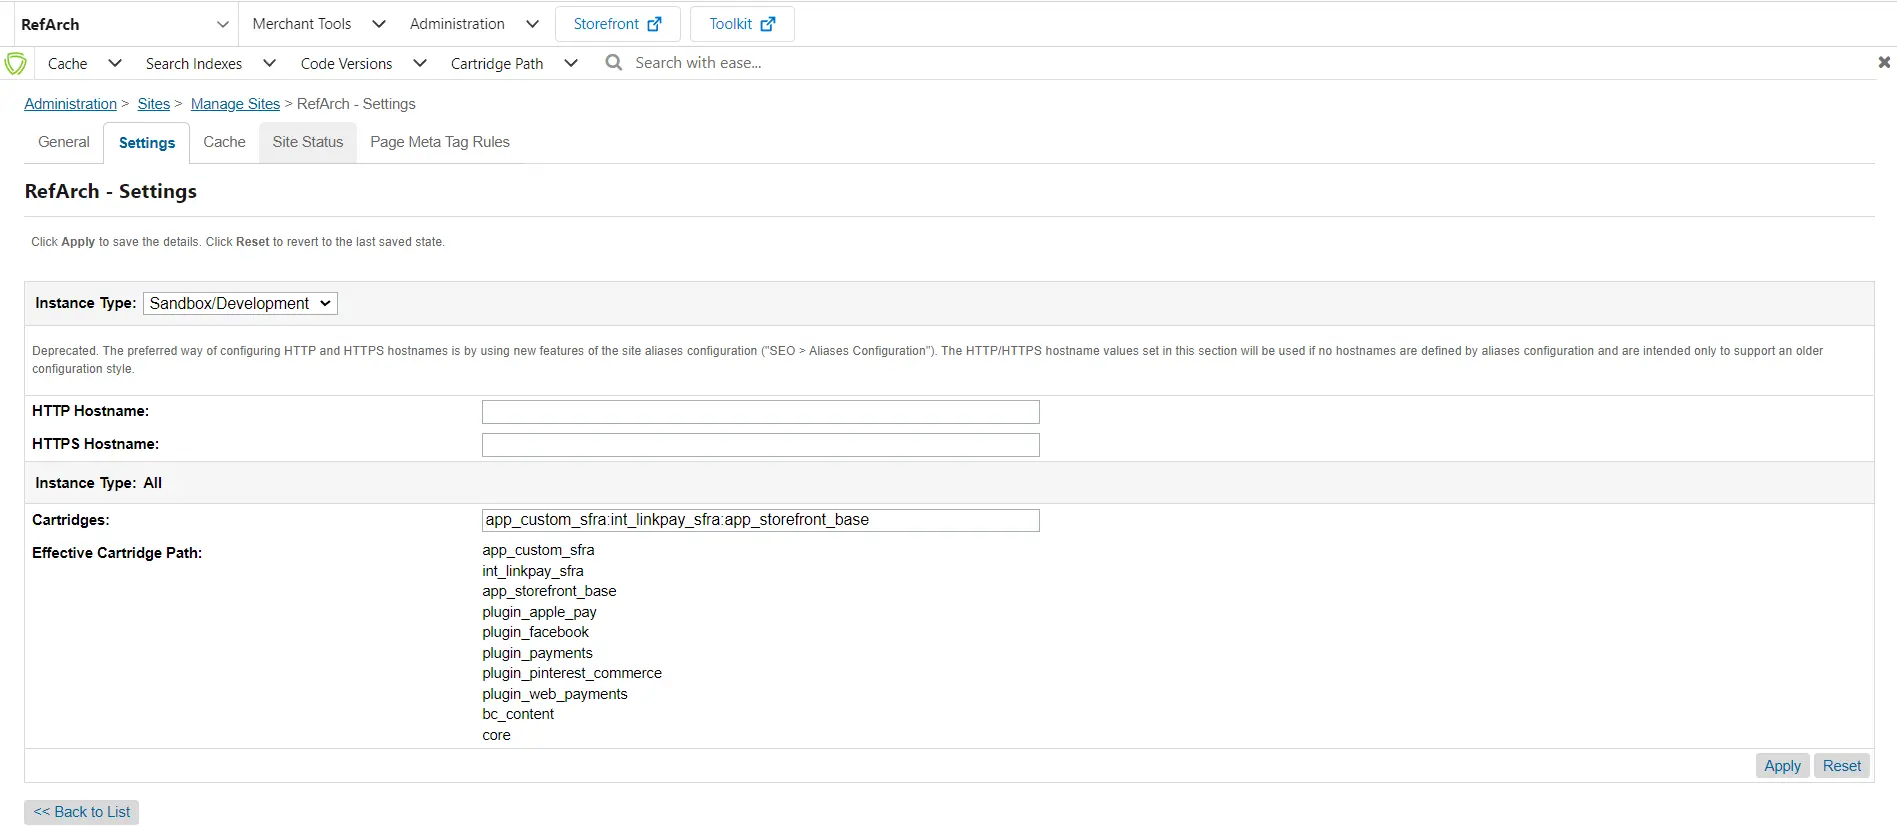
- Click Apply to save your changes.
The Link Money cartridge is now registered and included in your site’s runtime environment.
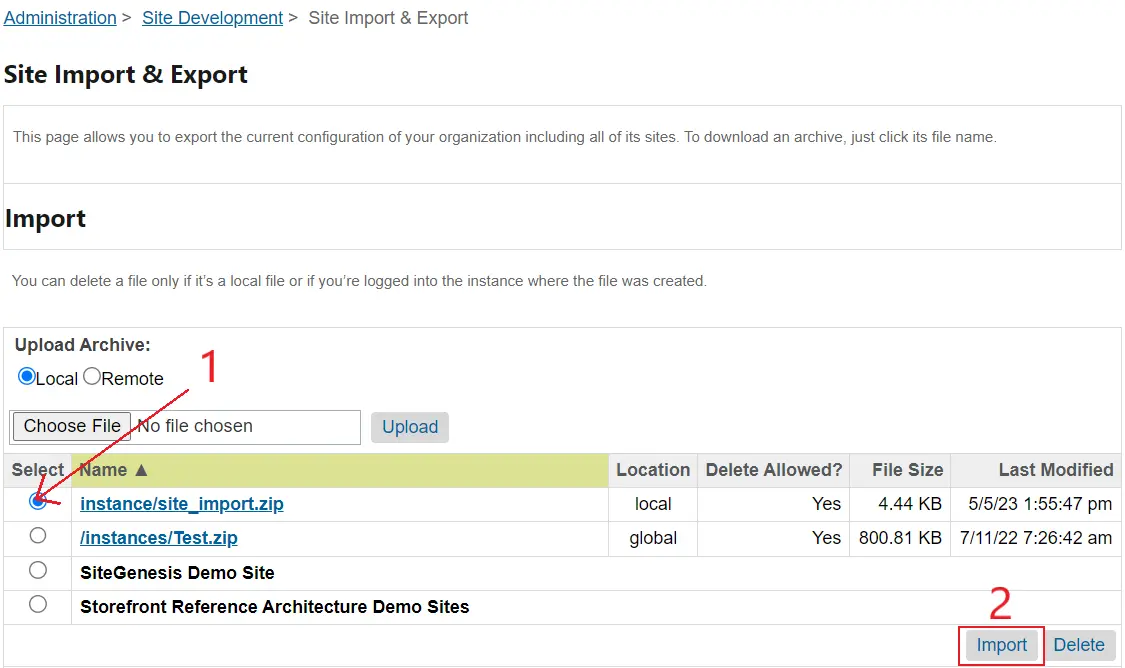
Step 4: Import the metadata
To add new configuration items, import the metadata:
- Open metadata/site_import/sites/RefArch.
- Rename the RefArch folder to the ID of your site in the Business Manager.
- Zip the site_import folder.
- In the Business Manager, navigate to Administration > Site Development > Site Import & Export.
- Upload site_import.zip.
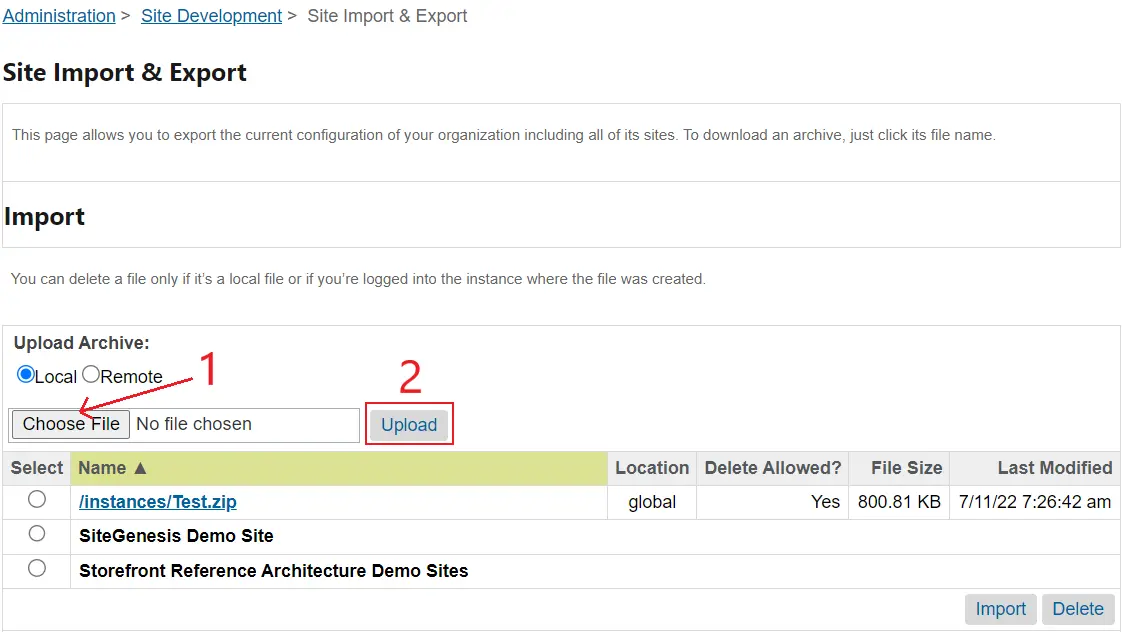
- Select the uploaded file and click the import button.
Step 5: Update Link Money configurations in custom preferences
After importing the metadata you will get a new Link Pay custom preference group. Navigate to Merchant Tools > Site Preferences > Custom Preferences and open Link Money group.
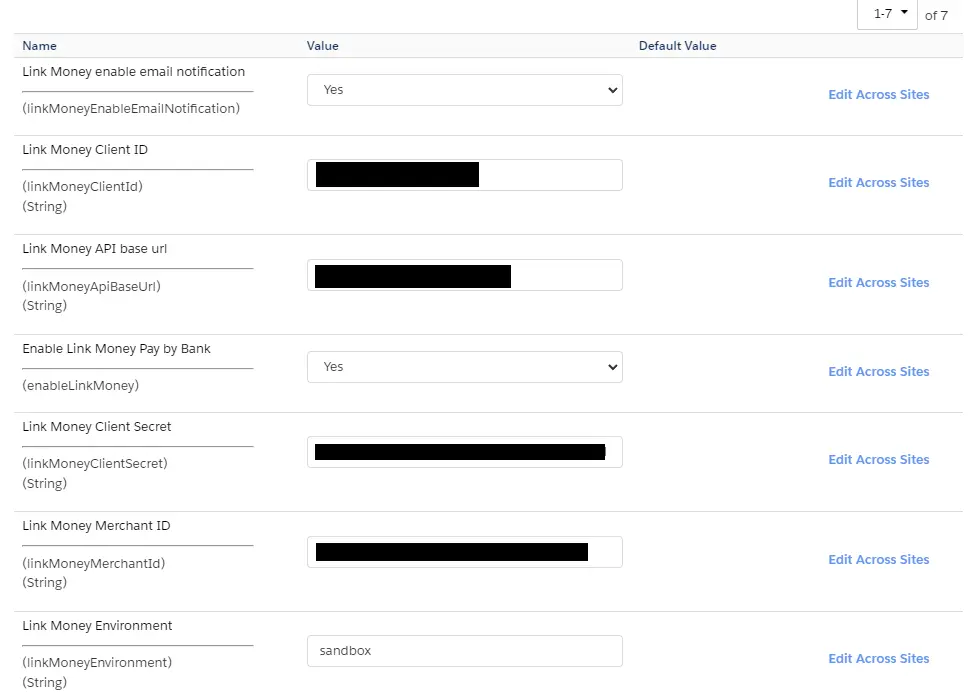
Here you can fill in the Link Money API base url, Client ID, Client Secret and Merchant ID for all of your sites. All these values will be provided to you by Link Money. The value of Link Money Environment should be set to either production for use in a real store or sandbox for testing purposes.
Step 6: Top level custom cartridge customizations
To make Link Money’s Pay by Bank payment method visible at the checkout payment selection page you will need to customize some checkout templates:
- paymentOptionsContent.isml
- paymentOptionsSummary.isml
- paymentOptionsTabs.isml.
All of them must be located in the cartridge/templates/default/checkout/billing/paymentOptions folder:
- paymentOptionsSummary.isml
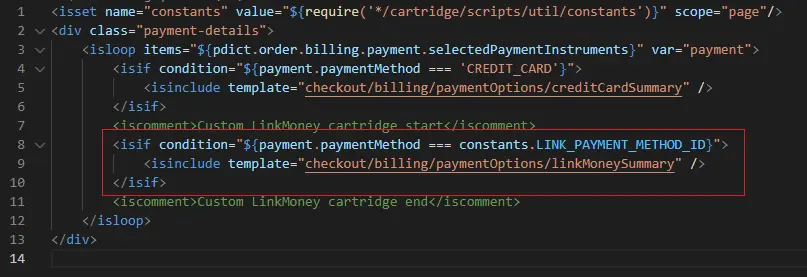
- paymentOptionsTabs.isml
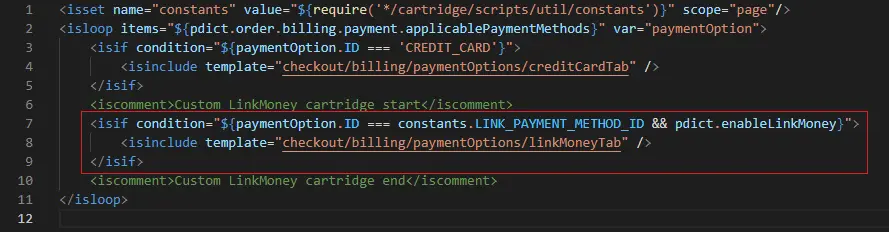
- paymentOptionsContent.isml
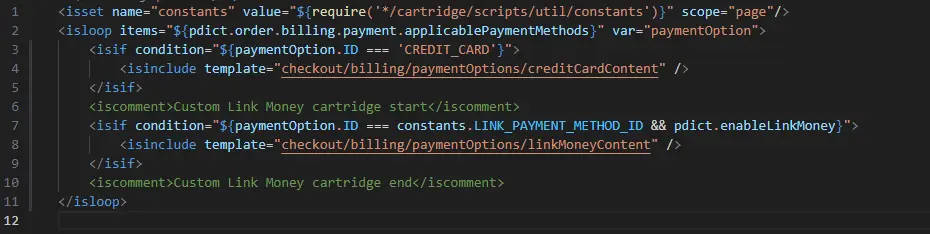
This is an example customization of app_storefront_base cartridge. Other customization recommendations can be found at app_storefront_base_sfra_changes and int_linkmoney_sfra under cartridges under Custom Link Money cartridge start comment.
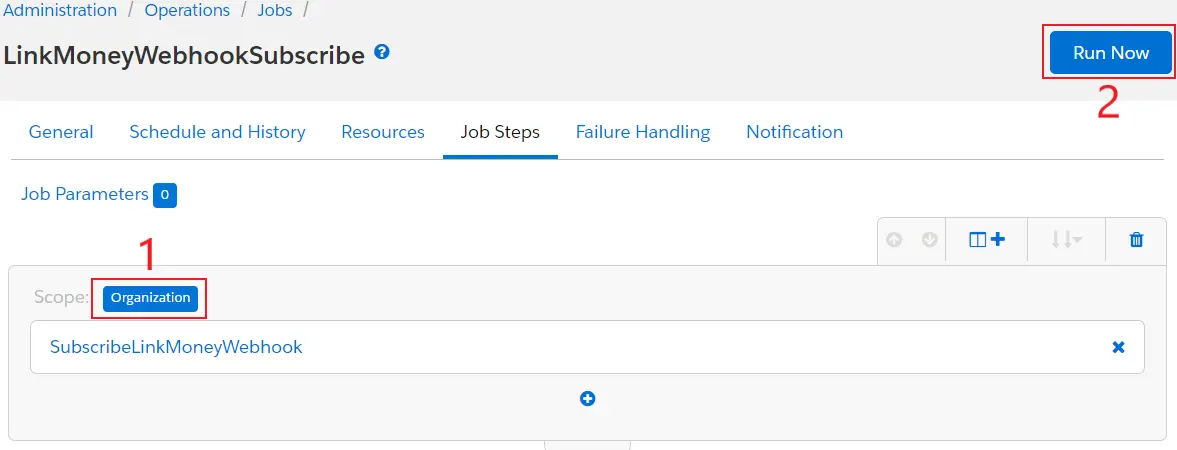
Step 7: Run LinkMoneyWebhookSubscribe job
To get notifications and update orders payment status run a subscription job.
- Navigate to Administration > Operations > Jobs.
- You will find the two new jobs: LinkMoneyWebhookSubscribe and LinkMoneyWebhookUnsubscribe.
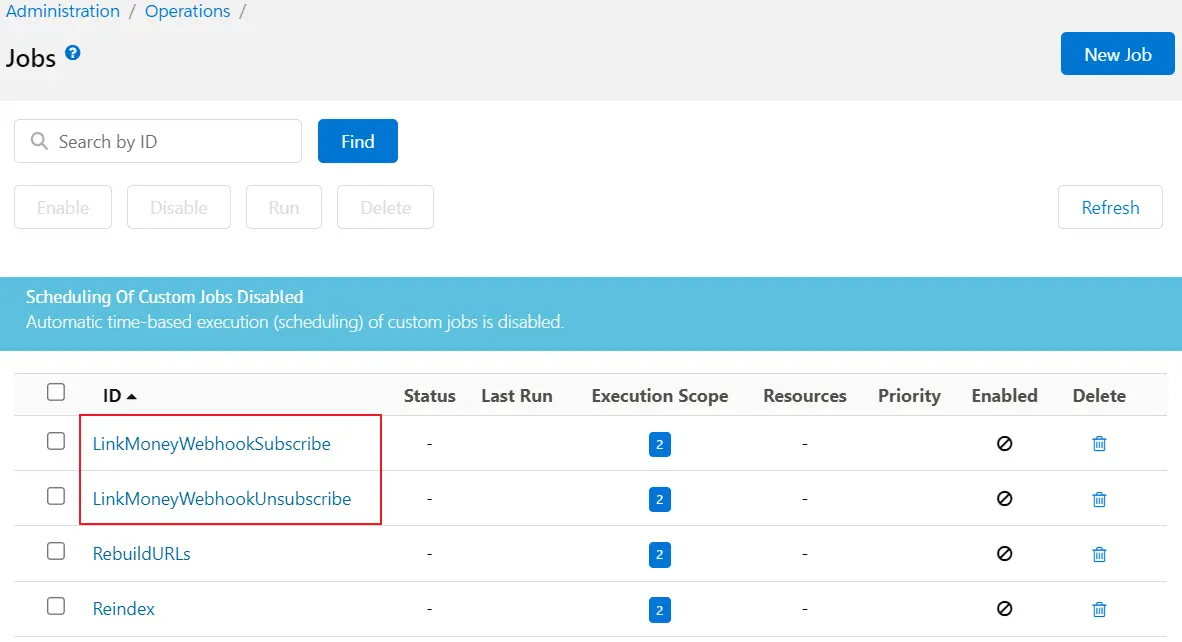
- Open LinkMoneyWebhookUnsubscribe job and click the Jobs Steps tab.
Click the Organisation button at SubscribeLinkMoneyWebhook job step, select sites that you want to be subscribed to webhook notifications and click the Run Now button.
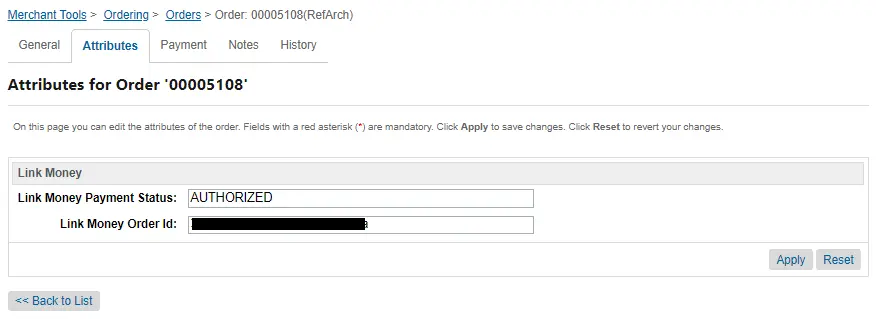
Step 8: Order overview
After running the subscription job, the website’s listening route will receive notifications about the payment. Specifically, it will receive changes in status and will update the order’s payment status. Here are the steps to check the order attributes for a purchase made using Link Money.
- Navigate to Merchant Tools > Orderings > Orders.
- Click the Find button to get all orders list or fill in the order number and search for the exact order. Open the necessary order.
- Clicking on the Attributes tab you will find Link Money Payment Status and Link Money Order Id. The full list of payment status codes can be found in our webhooks section. The Link Money Order Id is the reference id of the transaction and you can use this value to find the corresponding transaction in our Merchant Portal by filtering reports using Reference Id.
- On the Payment tab you will be able to check the general order payment status, whether it is Paid or Not Paid. When Link Money returns a
SETTLEDpayment status it will set the general order payment status to Paid. Also note that the transaction id, linked bank name and last four digits are displayed.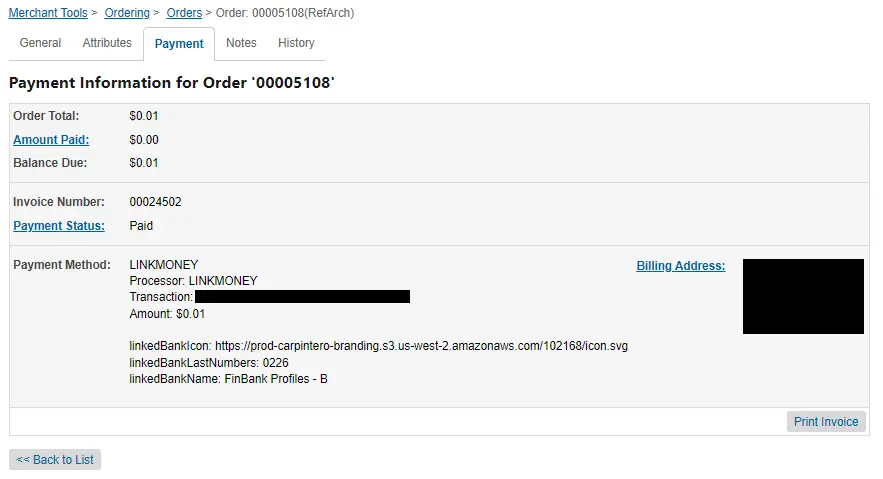
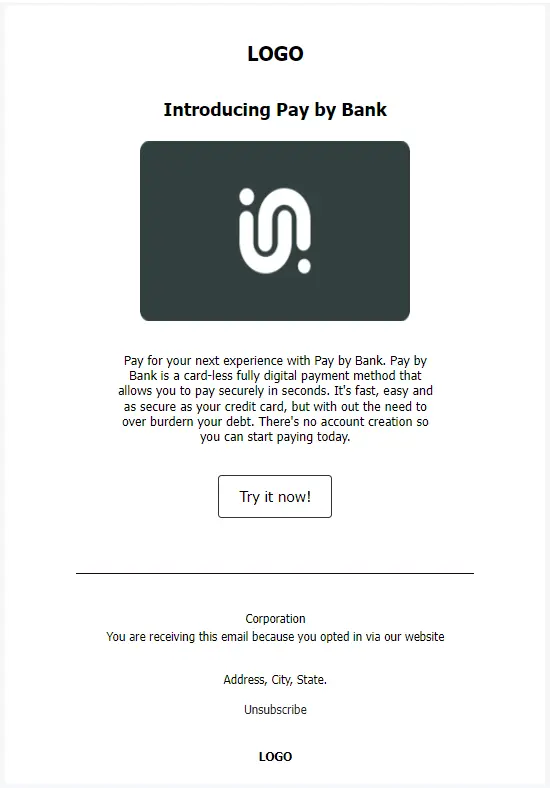
Step 9: Link Money email template
We have prepared a Link Money-branded email template to notify customers about the different payment and order processing activities. All string values can be configured via \cartridges\int_linkmoney_sfra\cartridge\templates\resources\linkmoney.properties and \cartridges\int_linkmoney_sfra\cartridge\templates\default\linkMoney\linkMoneyNotificationEmail.isml files. You can trigger this email by calling the sendNotificationEmail method of \cartridges\int_linkmoney_sfra\cartridge\scripts\util\linkMoneyHelper.js whenever it is convenient.
Testing and Troubleshooting
After completing the installation, thoroughly test the payment process to ensure proper functionality. Verify that all payment methods work as expected and that transactions are being processed correctly.
Should you encounter any issues or require assistance, contact your Link Money account manager for support.
Conclusion
With the Link Money cartridge installed and configured, your Salesforce Commerce Cloud site is now fully integrated with Link Money Pay by Bank as your payment solution.